First you are going to need a few things. Please be sure to read everything before you go out and buy stuff. If you dont think you can do this dont spend the money, instead hire a professional. First you need to measure the opening of your windows. You need to get as exact as you can. This will tell you how much plywood to buy. On average you will need on piece of plywood per window unless you have some really small windows. Plywood cost between $20 a piece to $75 depending on the quality of the wood. I am only suggesting that you get ¾ inch plywood. This is not where you go cheap. You can get pressure treated or marine grade plywood which will protect the wood from water damage over time. Of course they are on the higher end of the cost meter. Try to borrow a circular saw or any saw that you can handle that will cut plywood. You will need a small power drill. You will be make straight cuts. Get a screwdriver or screwdriver head drill bit, as this will save your arms. You will also need a hammer. If your windows are not square borrow or buy a plane. Use this to shave the edges of the plywood to alter the size a little at a time. Now go to the store. You need: ¾ inch plywood covering the size of each window. If you are not sure take your measurements to a sales person at your local lumber store and they are usually happy to help. Do this before a storm is on the way, otherwise it will be too busy to get quality help. 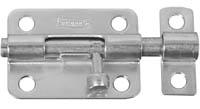 Buy a box of 3 or 4 inch barrel bolts. These are normally in your hardware section and are commonly used for fence gates. Dont buy by the bag or piece if you can get a contractors box of them. You are going to need at least 4 per window and on the larger windows, one per two feet of linear border. I chose to get four for my small windows and eight for the big ones. Buy a box of 3 or 4 inch barrel bolts. These are normally in your hardware section and are commonly used for fence gates. Dont buy by the bag or piece if you can get a contractors box of them. You are going to need at least 4 per window and on the larger windows, one per two feet of linear border. I chose to get four for my small windows and eight for the big ones.
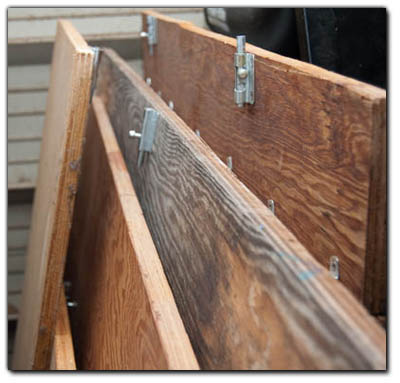
Now that you have your wood and hardware, get all your tools together and work on one window at a time. Each window should have a opening that you have pre-measured. Most windows will have at least a two inch inset of the window from the exterior wall to the window. Using the saw cut the plywood to fit snugly inside the opening of the window. It is very import that you get a good fit. If the window is not square then use the plane to shave off a little plywood at a time to ensure a good fit. Once you are sure you have the plywood cut and it fits perfectly in the window, label the piece of plywood. Be sure to mark which side is the side facing out and what is the top. Also be sure to mention what window/room you are protecting. This step is very important. If your window is not square putting in the plywood upside down will not work and cause problems. Also if you label which window you are protecting, later when you are putting up a number of them you will be doing trial and error trying to figure out which shutter goes with which window. 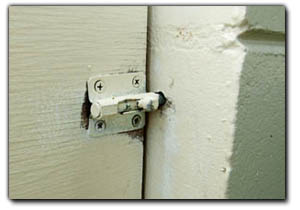 Now that the plywood is cut and fits in correctly, and you have labeled it you can go ahead and screw the barrel bolts to the panel. Be sure to install one on each side of the panel. For a larger window you should put a bolt every 24 inches or so. If the window is very large and the panel is too heavy to carry you may want to install a handle or two to make it easier to maneuver. If you are covering a larger area like French or sliding glass doors you can use a piano hinge to make two panels that will fold and store easily. Just be sure to have more barrel bolts to support such a large panel. Check to make sure each bolt can slide back and forth with ease and it is not time to put the panel back in the window. This time while someone is holding the panel in place mark where each barrel bolt slides up against the wall. Use a pen and be sure you draw a circle around the entire bolt. This will be sure you know exactly where the center is so you can drill the bolt holes. Now that the holes are marked pull down the panels again. Now that the plywood is cut and fits in correctly, and you have labeled it you can go ahead and screw the barrel bolts to the panel. Be sure to install one on each side of the panel. For a larger window you should put a bolt every 24 inches or so. If the window is very large and the panel is too heavy to carry you may want to install a handle or two to make it easier to maneuver. If you are covering a larger area like French or sliding glass doors you can use a piano hinge to make two panels that will fold and store easily. Just be sure to have more barrel bolts to support such a large panel. Check to make sure each bolt can slide back and forth with ease and it is not time to put the panel back in the window. This time while someone is holding the panel in place mark where each barrel bolt slides up against the wall. Use a pen and be sure you draw a circle around the entire bolt. This will be sure you know exactly where the center is so you can drill the bolt holes. Now that the holes are marked pull down the panels again.
 Ensure you get a drill bit that will be the same size as the bolt you are using. Using the drill make a hole in the center of each mark that you have made in the inset of the window. Be sure to drill in enough to allow the entire bolt to slide into the concrete and lock. Once you have made all the holes, bring back the panel and try to slide all the bolts in place. If any of them dont slide in place right away you can lightly use a hammer to help it along. If it still does not work pull down the panel and make whatever adjustments are necessary and try again. Once it fits perfectly you can move on to the next window. Ensure you get a drill bit that will be the same size as the bolt you are using. Using the drill make a hole in the center of each mark that you have made in the inset of the window. Be sure to drill in enough to allow the entire bolt to slide into the concrete and lock. Once you have made all the holes, bring back the panel and try to slide all the bolts in place. If any of them dont slide in place right away you can lightly use a hammer to help it along. If it still does not work pull down the panel and make whatever adjustments are necessary and try again. Once it fits perfectly you can move on to the next window.
When all the windows are done you may choose to waterproof them with a coat of varnish or paint. I painted mine. Oh but be sure if you paint over the markings of which window it was for and what way was up that you remark it after the paint dries. Find a dry, cool place to store the panels since heat and moisture can damage and warp the plywood. If this occurs it may require more adjustments before it will fit correctly. Now I am assuming you listened to me and did be way before there was a hurricane warning and people are running to the stores to get supplies. You have tested each window and are certain that you have a good fit and the bolts close perfectly. You have stored the panels in your garage or another dry place and are prepared with shutters if a storm was to arrive. |  A number of years ago after Hurricane Andrew I bought a house. I decided to do some research on how to protect my home in the event of a hurricane. As a computer guy the first thing I did was go to the internet. I went to the National Oceanic and Atmospheric Administration Website and visited their research division. I found a ton of information about hurricanes and what to expect. It also touched on how to protect your home. Many people in Florida always ask should I put up storm shutters and when. There is no easy answer on the subject. I also dont claim to be an expert, but after reading reports and doing a ton of research I figured I would show my findings and how I protected my home from three back to back hurricanes. I would like to credit Mr. Stan Goldenberg at NOAA as a great resource of information for this article.
 So where should you get hurricane shutters, and who should you trust to install it? First do your research. Find out if you are able to do the install yourself. If you dont feel comfortable doing it then look for a company in the same fashion you would for any service. Make sure they are licensed and ask questions. Check them out with the Better Business Bureau or local contractor association. When you talk with the contractor make sure you understand what they are offering. Dont get pushed around. If you dont like the installer, or feel pressured into making a decision right now, STOP and talk to another company. You are trusting this company with the safety of your family and home. Be sure they are knowledgeable enough to do the job and inform you on how to use the shutters. You wont learn much from someone that you cant understand or get along with.
 Dont panic; remember you got your shutters all ready. I hope you stored it in an easy to get to place and did not cover them with a bunch of stuff but if you did move the stuff that is in the way and get those panels out. Read on each panel which window it was designed for and which way is up. Move the panel to the window and place up on the window. Slide the bolts in place and if you have any resistance use a small hammer and lightly help that bolt along. After a few months of storing your panels the holes in the concrete may have be filled up with dust or insects. Using the hammer will remove any debris and get that panel up in no time. Now that you have installed all your panels, dont remove them until after the storm and you are certain there is no more danger of flying debris. You may notice that with the panels up your home is cooler temperature wise. You may decide that some of the panels should stay permanently to keep certain rooms cooler. I dont suggest doing that to any of your front windows but I have let some of the back panels up all summer long and it made a significant difference to my cooling bill.